Another 3 months have flown by. It must have been the most unproductive 3 months I've ever had with my hobbies, just because graduate workload has taken precedence and priority and all the time I had. I finally picked up my knitting again last weekend and am going to experiment making chocolate cheese cake this weekend. Thank you everybody who has stuck out with me and still supports me. I hope you will find today's blog worth the read.
I have thought to myself many times, why do I put so much thought and time towards designing each piece of jewelry but not want to make a few pieces of the "perfect design"? That way, I can probably sell more and think less. My motivation was to keep myself from the temptation of falling on typical designs and make for profit only. I wanted each piece of jewelry to "experience" an equal amount of effort and attention from me, as if they would be jealous of each other. I think I found another motivation recently.
I have thought to myself many times, why do I put so much thought and time towards designing each piece of jewelry but not want to make a few pieces of the "perfect design"? That way, I can probably sell more and think less. My motivation was to keep myself from the temptation of falling on typical designs and make for profit only. I wanted each piece of jewelry to "experience" an equal amount of effort and attention from me, as if they would be jealous of each other. I think I found another motivation recently.
Early Spring was one of my simplest and favorite design. When I first made it and placed it on sale at The Front Room, it was gone the very next time I went back to the shop to add other items to the shelf. Last week, when I showed a fellow graduate student, Janhavi, my Artfire Studio, Early Spring caught her eyes immediately. She requested for a remake of the pair and specify for me to make it in time for her trip back to India at the end of this week. Gosh, I was proud and filled with joy! That's what makes the difference: when someone request for a remake, it is an encouragement and compliment that shouts, "The design is so awesome and I like it so much that I don't mind the fact that there is one other person who has it already!"
The teacher in me is creeping in again. So I would like to make use of this opportunity of remaking Early Spring, to write a simple tutorial for those who are interested in making your own jewelry. It is not hard to start at all, but you may find it difficult to stop : ) The tutorial is specific to this design but you can throw in any focal or accent findings you like for your very own design.
Being a scientist made me look at everything as an experiment. Be it cooking, knitting, crocheting or jewelry making, I will always have the "Materials Required", "Equipment/Tools Required", "Procedure" and a bunch of "Notes" in my mind. By putting these down in writing today, I hope you will find it useful as a quick project. Here we go:
Design Inspiration:
It was Spring 2010 and flowers were blooming everywhere. Butterflies are just one of the many insect pollinators but they are depicted to be beautiful and elegant. I'd like to put that picture on a pair of earring. Specific technical goal of this pair of earring was that it must be simple and not use any jump ring at all.
I looked through my photo album today and look what I found:
This picture was taken in "Jardin Botanique" in Montreal, Canada on the 3rd July 2010. Early Spring was designed before this picture was taken.
Materials Required
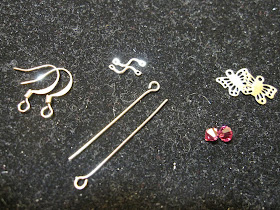
A pair of 16mm Rhodium French earring hook
2 x 4mm Fuchsia bicone (Article no. 5301, or upgraded 5308) Swarovski Crystal
2 x 10mm S-shaped linker
2 x 9mm by 11mm Butterfly charm
2 x 30mm (minimum length) metal tone eyepin
Note:
1. When selecting material, go for the best ones you can afford. Pure Rhodium earring hooks are not as well-known as 925 sterling silver, but they are comparable in price, hypoallergenic and tarnish-free. It is my hook of choice. Unfortunately, it is metal-tone in color, which you may want to reconsider if you are using sterling silver findings (bright white in color).
2. Buy Swarovski crystals in bulk from online suppliers, or else you may be paying 3-4 times the price in the shops. In my opinion, bicones are the most flexible for designing.
3. Not all Swarovski colors can stand on their own. Go to a shop to learn the colors you like before you purchase in bulk.
4. Size plays a big part in design, too. Very often, you need to put your focal items and accent items side by side to make sure they are balanced.
5. I am not associated to Swarovski in any way, but I have to mention that you do not want to settle for anything less. The difference is noticeable.
Tools Required:
Chain nose plier (Non-serrated preferred but serrated is ok for non-delicate metal)
Round nose plier (A full size pair is easier to work with)
Side wire cutter (Normal wire side cutter will do just fine)
As with material, go for the best you can afford but accumulate slowly. Getting the right tools for the job is important but these three basic tools are good for a start.
Procedure:
Before you begin, find a conducive workspace where you can have white light over your work, a comfortable seating position and a surface lined with felt or velvet type material to keep your beads from rolling off the table. A beading tray is ideal but not absolutely necessary. Lay out all the materials you need.
1. Take one 30mm eyepin and insert the 4mm bicone bead.
2. Make a 90° bend against the bead using the chain nose plier.
Note the direction of bend.
3. Leaving about a quarter to a third of an inch from the right angle bend, cut the wire with the side cutter. The length of the "wire tail" determines how big your loop is going to be.
I like to use my index figure as the gauge for length because feeling it is more consistent than looking at it for me. That's provided you have a fleshy finger like mine : )
4. Repeat Step 1 to 3 on the other eyepin to ensure you have a consistent length of "wire tail" for making the loop.
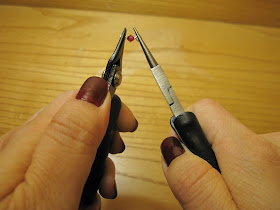
5. Hold the round nose plier with turned-out wrist and grab the end of the "wire tail".
This is the most difficult step for ALL beginners because you need to gauge the size of the loop by the position of the round nose plier you use. The nearer to the tip you are, the smaller the loop you will get. Insert the plier into the loop that is already made on the eyepin to have an idea of which part of the round nose to use.
5. Roll the "wire tail" towards yourself, applying pressure on your supporting index figure and righting your wrist at the same time.
You can break the motion down by going back to the turnout wrist position, or make smaller turns from a less turn-out position. You may be able to achieve a nicer loop that way. All you need is practice, so don't give up just yet.
6. Adjust the loop with the chain nose and round nose plier so that it sits directly above your crystal (makes a perfect 8 around the crystal) and are in the same plane of angle.
There are few ways to check the loop. Insert either loop into your round nose plier and let it hang to check for balance. Visually the end of the loop should be centered and makes a perfect circle. The loop reveals the skills of the artist. I take this step very seriously. If you are unhappy with it, it is better to start over than to live with it.
7. You are now ready to assemble. Push the loop on the earring hook open by pushing one half of the loop away or toward you.
Do not open the loop like you are opening a coconut. You will spoil the wire.
8. Insert the S-shape linker and close the loop on the earring hook.
9. Open one loop on the eyepin with crystal in the same way and insert the other end of the S-linker.
10. Open the other end of the loop and insert the butterfly charm.
11. Do the same with the other side and there you have a pair of beautiful casual earring ready for Spring!
Enjoy the earrings! Yes, the organza bag comes with every purchase.


No comments:
Post a Comment